Studiodesk (DIY)
With the setup of the mastering chain, the reflections of my old studio desk (with huge, melamine-coated 240 x 120 cm tabletop) became a problem. Also my sideracks (both top loaders) did not correspond to my everyday life any more, because the rear sides of the devices were inaccessible in that case. However, there are switches there - e.g. the transformers of the "Mini Massive" EQ can be switched on and off. A new desk had to come - and the desks of the well-known manufacturers I did not really like - besides, they were far too expensive for me - it started at well over €3000!
The acute shortcomings of the old table already defined the most important details (approach by negation) and I also no longer wanted a "castle" behind which I am overbuilt. The whole thing should be absolutely "straight forward" - that is, the clearest possible shape and equally straightforward craftsmanship. However, such a fine piece of furniture was new ground for me and my tools were limited. Since my workshop (in the basement) is too small for such a large table, I was waiting for June in order to build the table on the terrace.
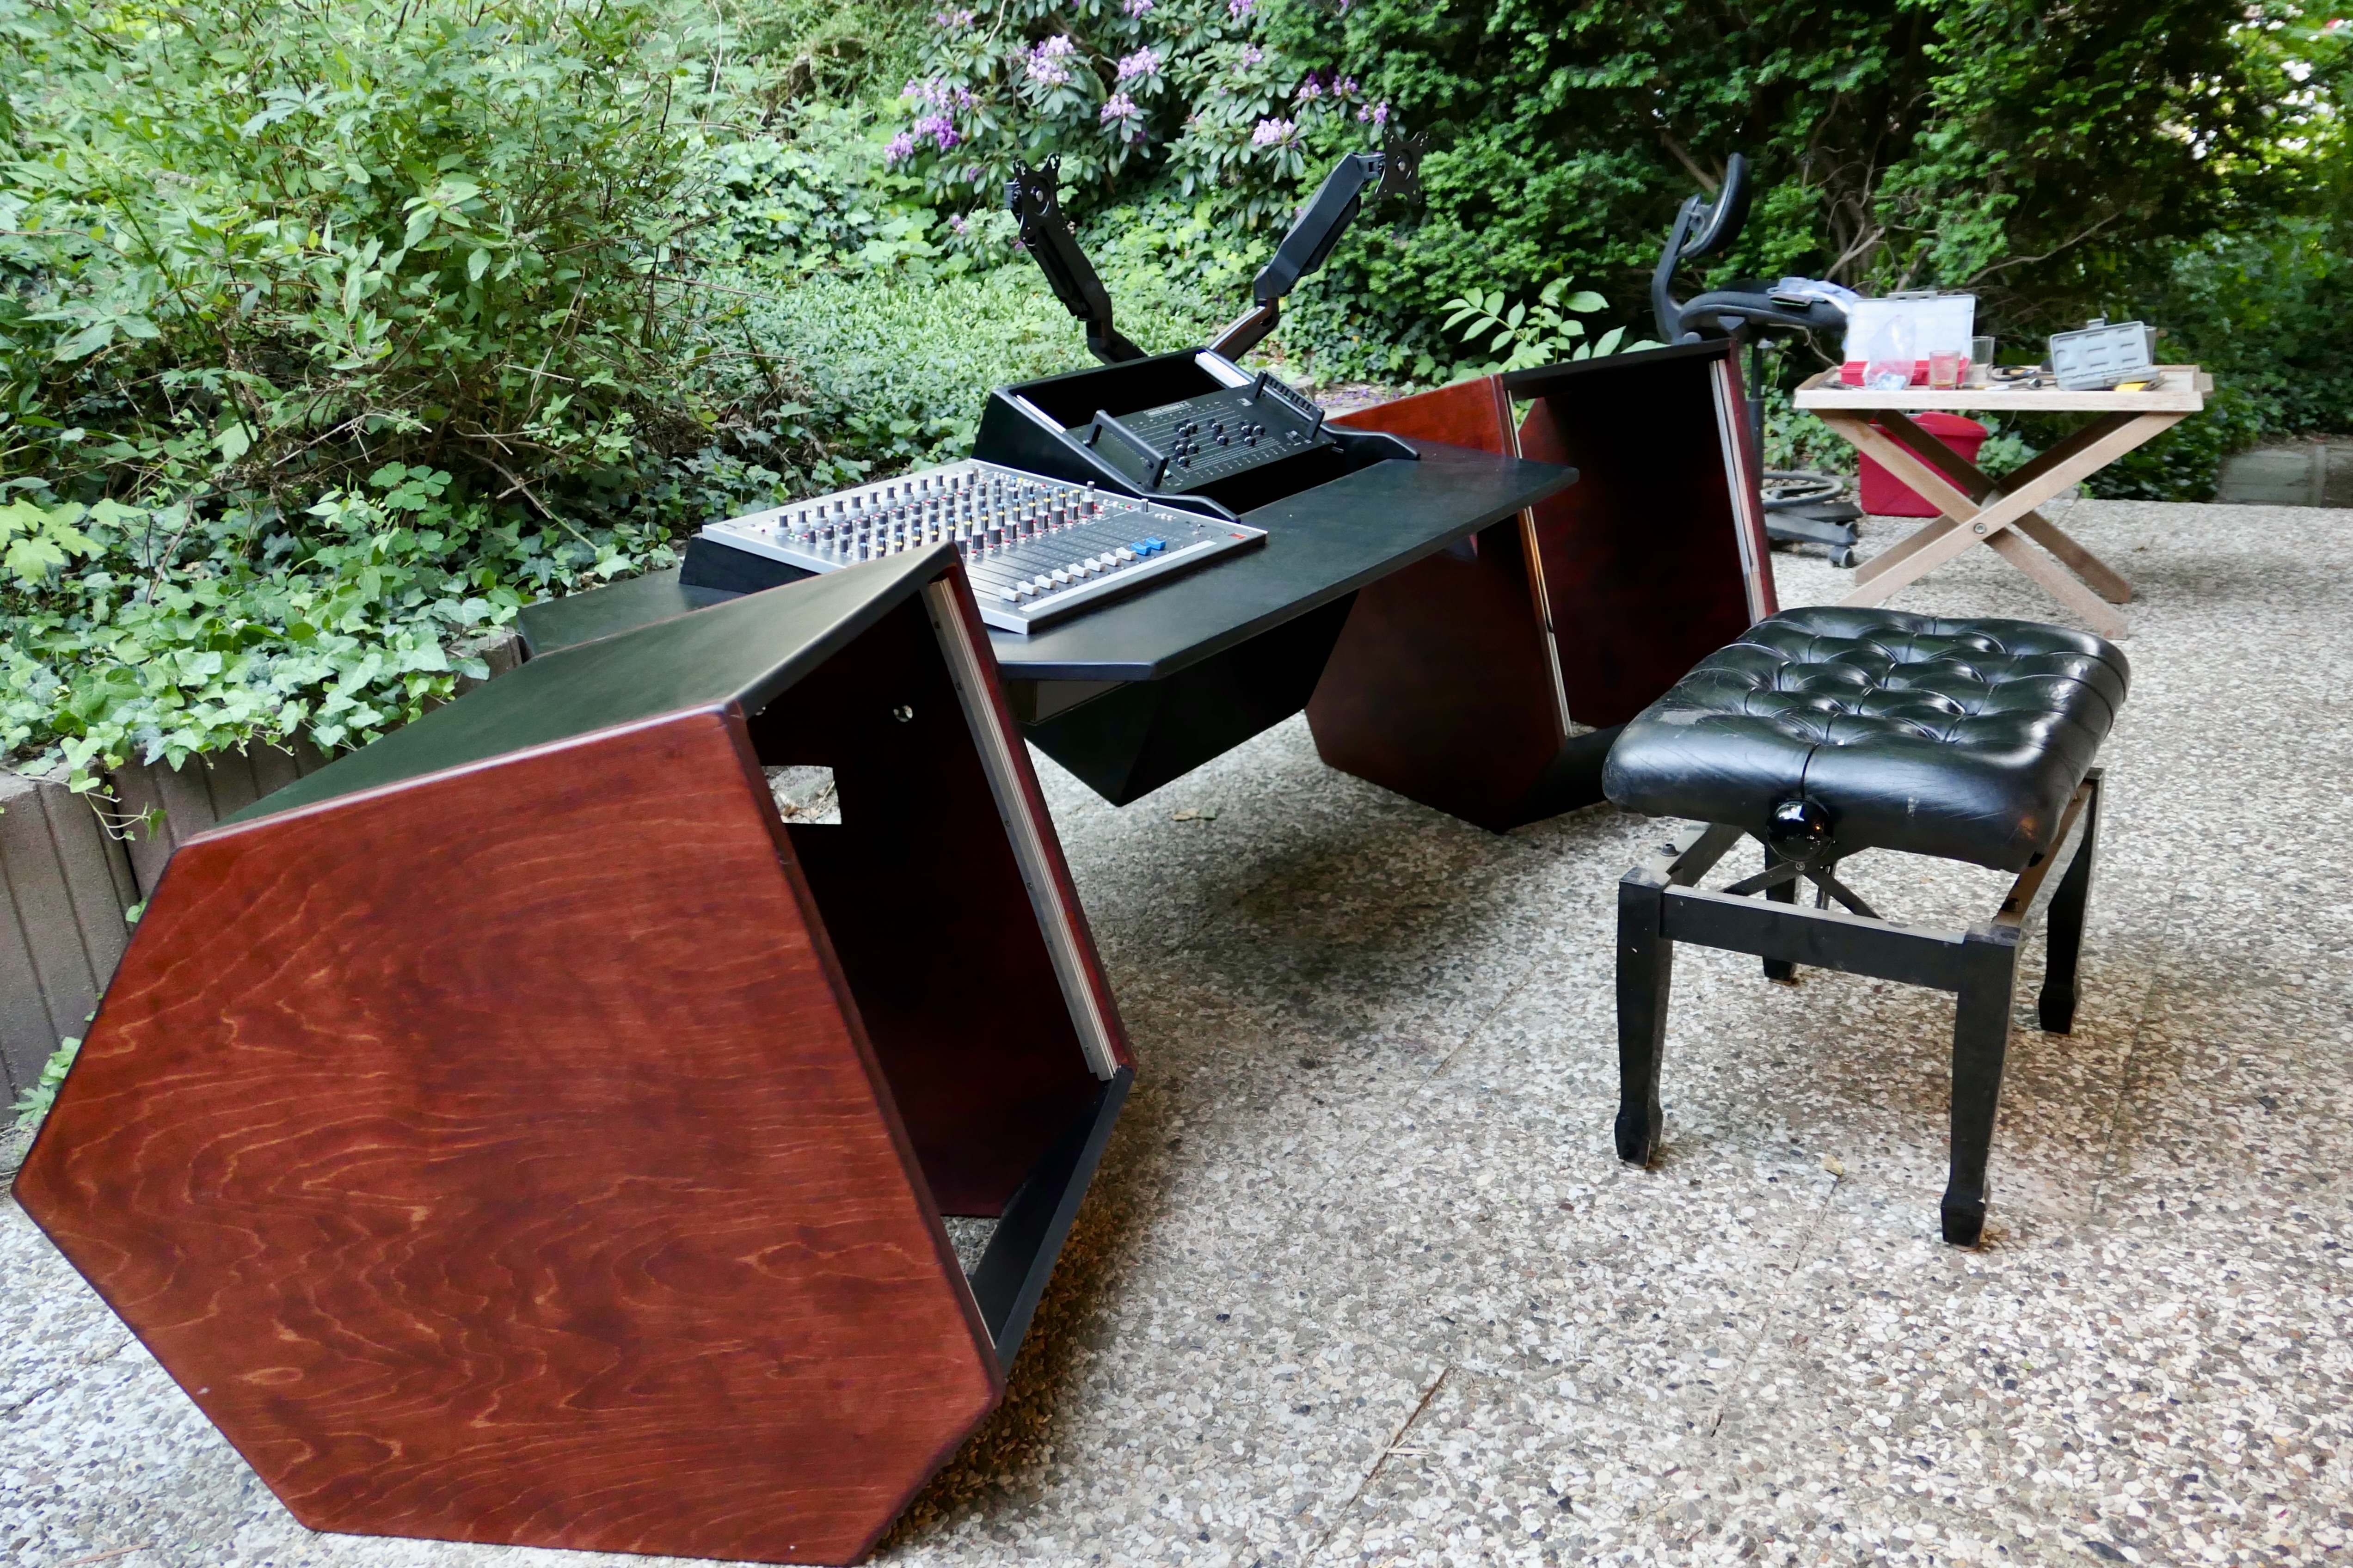
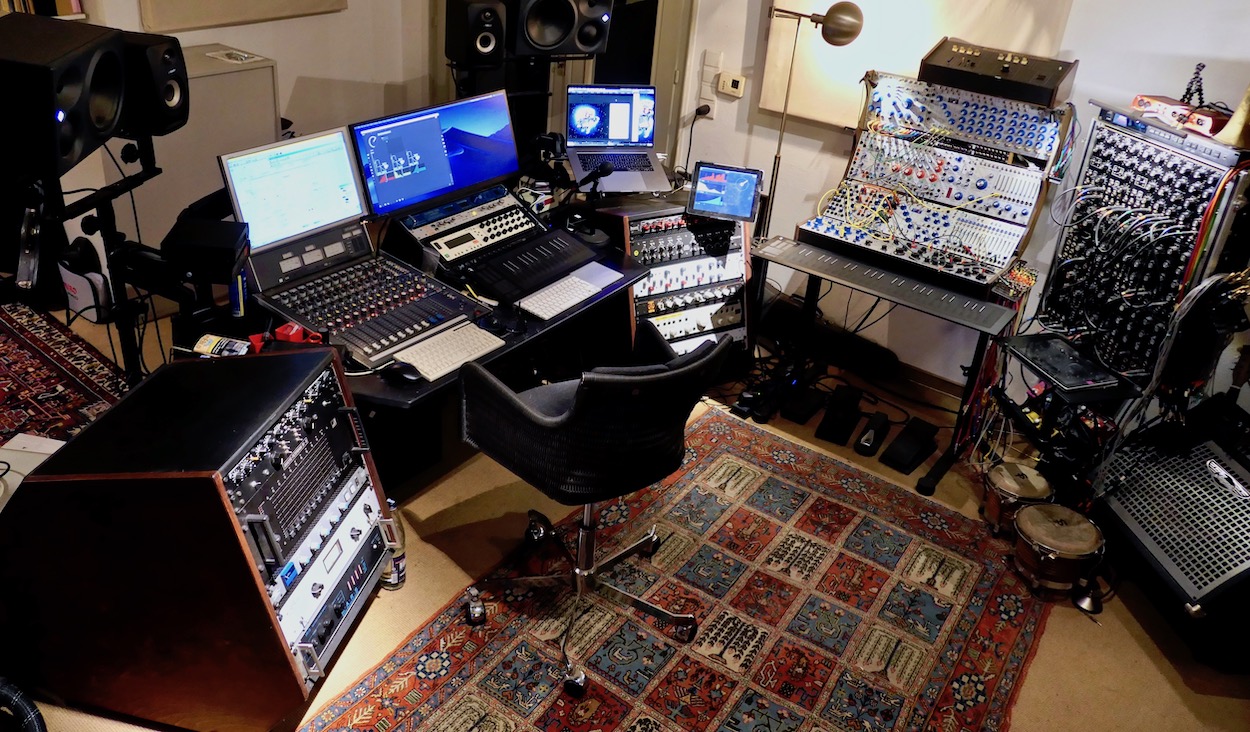
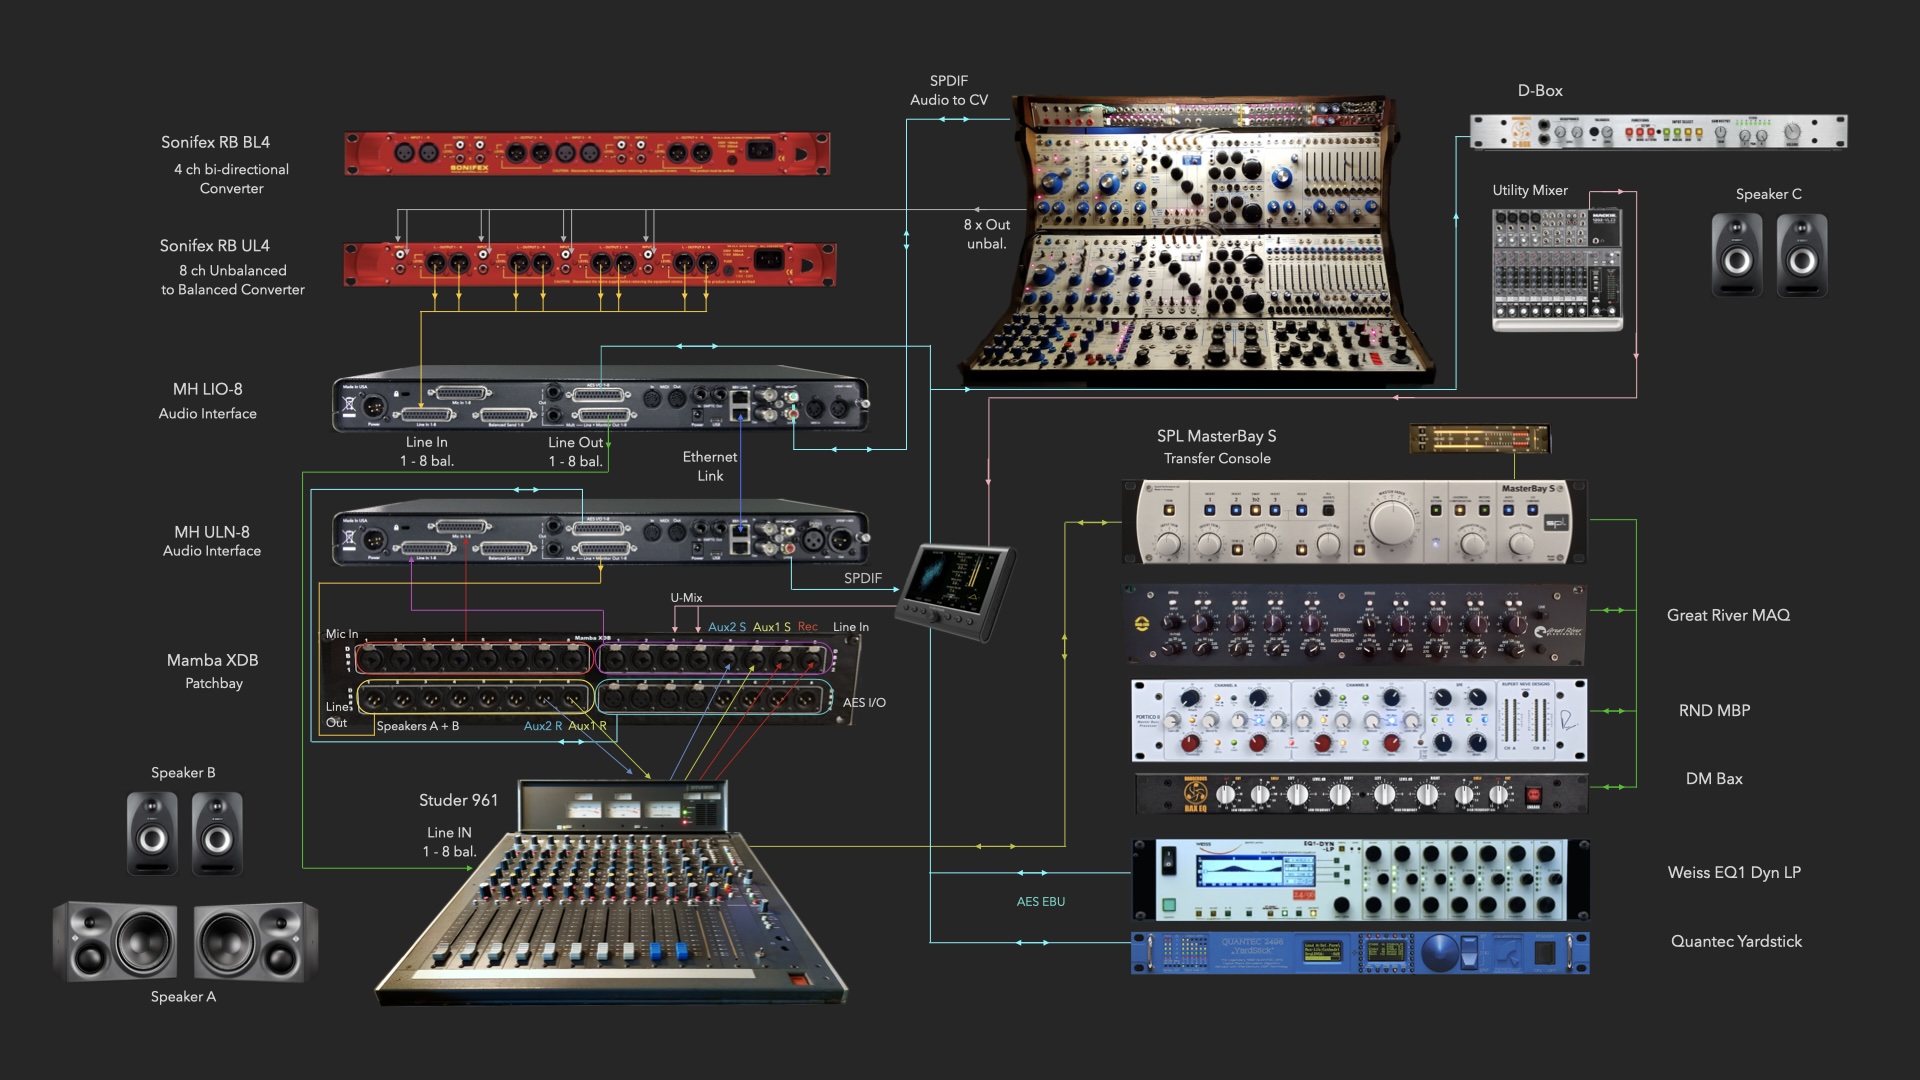
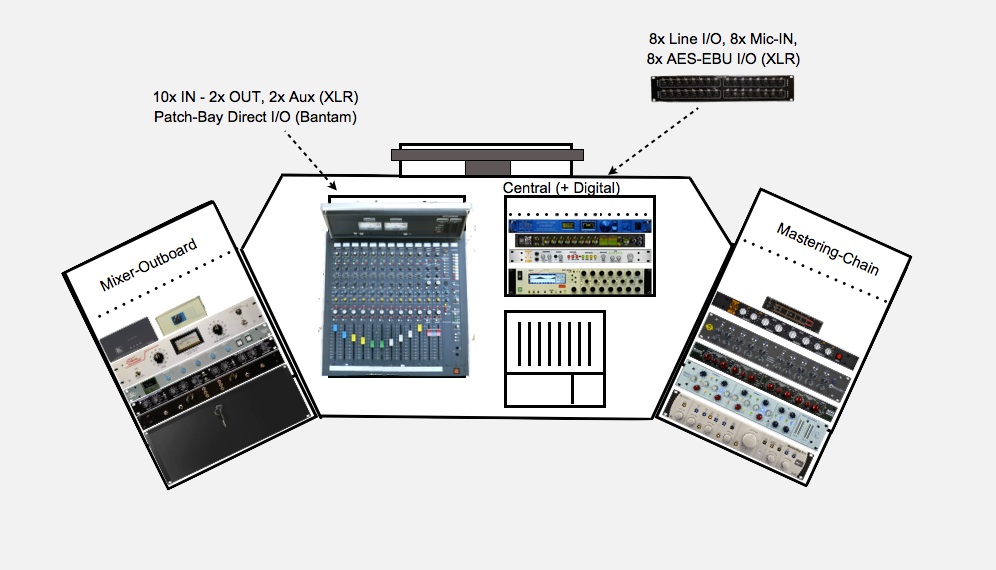 The basic idea was to let the frontloader sideracks hold the much smaller tabletop (164 x 80cm instead of 240 x 120cm). The left side of the desk is dedicated to analog tracking and summing, so the left siderack contains the processors ( preamps, EQs and compressors), which are connected to the Studer 961 console (in the left half of the tabletop). Since the tabletop consists mostly of holes, two crossbars (as a lying T-beam) are underneath for stabilization.
n the right half of the table is an 8U rack with the key mastering equipment, the center of my setup. In the right siderack are the audio interfaces, FX, more equalizers, monitoring and the transfer console. In front of the desk-rack are the computer keyboard with trackpad and occasionally the motorfader bank. The desk-rack has another 3U / 19 inch on the rear (below the table top) with a 19 inch power distributor (Hirschmann) and a patchbay.
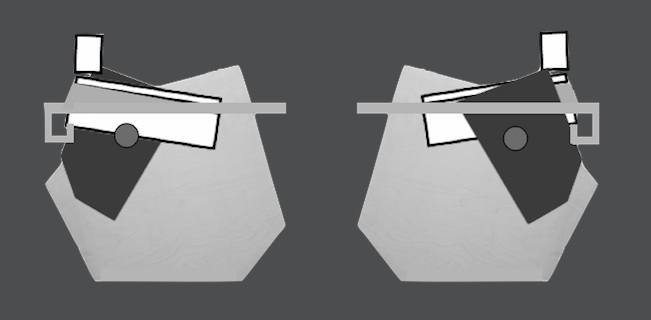 This is the cross-section of the table (from both sides). The desk-rack (black) got a different shape during the implementation - I originally planned with the shape of my old desk-rack. The dots symbolize the lateral openings in the desk-rack. At the rear end, under the table top, is the vertically glued strip that prevents the table from bending. At the same time, it hides the view of the cable channel. In the middle of the table runs the crossbar, which together with the rear bar forms a "T". After all, the tabletop consists almost entirely of holes - the console and filled desk-rack together already exceed 60 kg in weight.
The Construction
The two sketches shown above had already been my entire plans - it was pretty clear to me what the table should look like. Most of the widths were given anyway: 19 inches plus rack rails give the inside width of the sideracks and for the desk-rack 2x the wood thickness (side panels) has to be added to recess it into the table. This way it was possible to work with only rectangles (from the hardware store). I chose birch multiplex 21mm for the main parts and 15mm for some smaller parts (crossbars, mixer "ears", shelves for computers and hard drives).
To avoid a financial debacle, I first bought two 80x80cm squares. So I could first check whether I would be able to cut two equal side parts for the Siderack. Only after I succeeded, I bought the rest of the wood. I also bought a new multi-sander for €80 - a very good purchase, as it soon turned out.
 The photos show the first steps. At the top left you can see the first sawed side parts, and behind it the 80 x 80cm squares for the side parts of the second siderack along with the rest of the wood. The two small pieces are the support surfaces for the table top and made from the scrap of the first siderack side pieces. Next I sawed the table top to size - at the widest point it is 164cm, 140cm at the back and 110cm at the front. The top is 80cm deep and the bend (= the widest point) is on the line 60 / 20cm.
To avoid any theory errors, I first fitted the mixer (top right). This was concerned with the I/O's at the back, which must be accessible. In addition, the connectors must be able to be plugged in and out - this takes a little space and is best shown in a practical test.
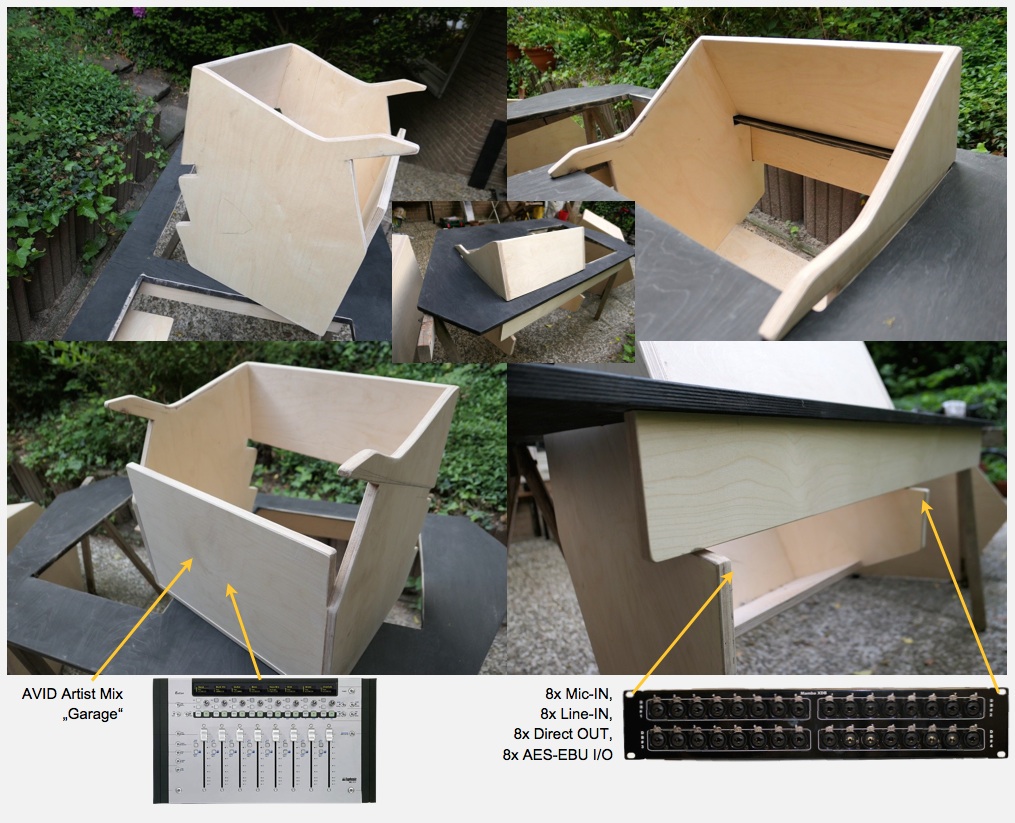
For the 8U desk-rack, I first used my old DIY 6U rack - until I came up with the better shape of the desk-rack just before installing the old one.
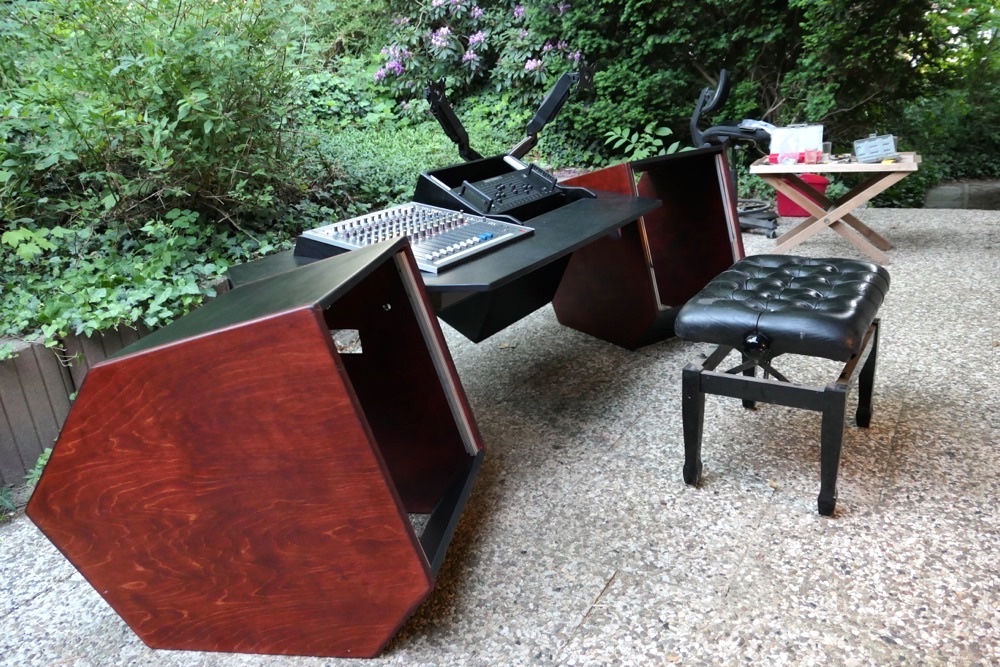
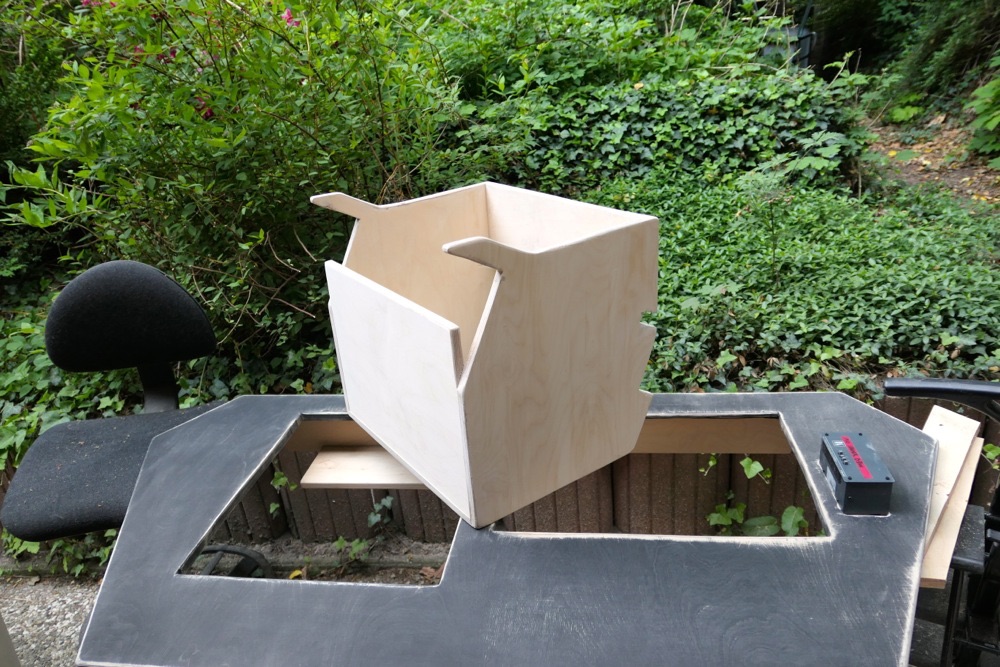 Here you can see the desk-rack - yet without openings on the sides. Its design is such that it rests on the tabletop at the front and back. This means that it does not need any lateral stabilization and can be easily removed - the whole piece of furniture can thus be transported more easily in individual parts if necessary. The protruding plate in the front of the desk-rack is there to "park" the motor-faders, since I use them rather infrequently. The Faderbank can thus be easily retracted into the table.
Now, here's where I get into the work / labor involved - for some, you may already be able to tell from the picture of the table rack what an orgy of sanding is involved in building the table! It was by far the longest single process during the entire construction. It's grind, wipe, soak, dry, grind again, wipe, soak, dry, and again and again. While doing this, gradually refining the sandpaper (I had 80, 120, 180, 240, 300, 400), making several passes with the same number starting at 120. This takes a lot of time and also requires some good nerves (of the neighbors)! But it is worth it. You can feel it. The wood becomes smooth and slick like a tile.
The watering: with a well-soaked sponge, moisten the wood well - make it really wet. Then, when drying, the hairs in the wood stand up, which, after complete drying, are sanded off again.  This makes the surface noticeably smoother / denser each time, and each time the water is absorbed less or more badly into the wood (surface tension). Therefore, the sandpaper should gradually become finer. As you can see, I have already glued the racks before staining (and sanding).
I tried various ways of staining. The best solution has turned out to be staining the first time at sandpaper thickness 80 or 120, because the stain is then drawn deep into the wood (I did this with the tabletop, which is why it is already black). If the wood is first sanded to a fine finish, the stain will only remain on the surface due to the fine structure of the wood and will be correspondingly sensitive. After staining, continue sanding, water dry, sand, water dry.... and at the very end, stain again and sand to a fine finish. 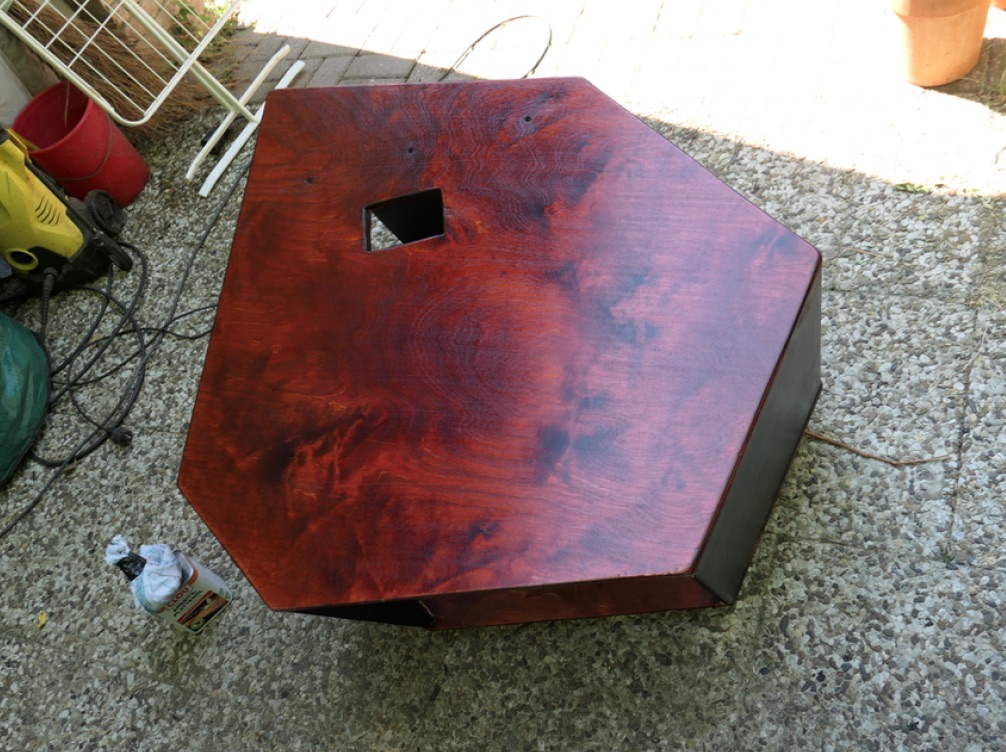
Since the sideracks have lighter side panels, I stained them first (and masked off the edges). Powder stain is much more efficient and much cheaper than liquid stain. The job is straightforward, but must be done in a controlled manner, as stain paint is difficult to remove if something splatters. Latex (or latex-free) gloves are also strongly recommended. To prevent the edges from darkening too much with lighter stains, it is good to moisten them with a sponge beforehand - this prevents too much stain/paint from being absorbed.
Finally, I oiled everything with kitchen worktop oil. This is food safe and does not stink. Very pleasant work - with a soaked cloth. 3 passages with at least 24 hours drying time in between. Even though it is very shiny after oiling, it does become matte once the oil is absorbed. However, it is important to go over it again with the cloth 15 to 20 minutes after oiling to absorb the excess oil - otherwise it will stick for weeks. After the last oil coat, it will take about 6 more days for the wood to be fully resilient. (I used that time to renovate the room the table was going into).
 To prevent the desk-rack from dropping out, I drilled two small holes into the tabletop, which are then located inside the desk-rack, at the corners. Two metal pins lock the rack and prevent any worse.
In the lower right photo of the 4-part picture, you can see how the crossbar under the tabletop rests on the table rack - this provides further protection against bending of the tabletop. The table rack is held in place by the tabletop. Underneath the crossbar is the place for the audio I/O panel and the power distribution.
Next, in the photo below, the table can be seen during setup / wiring.

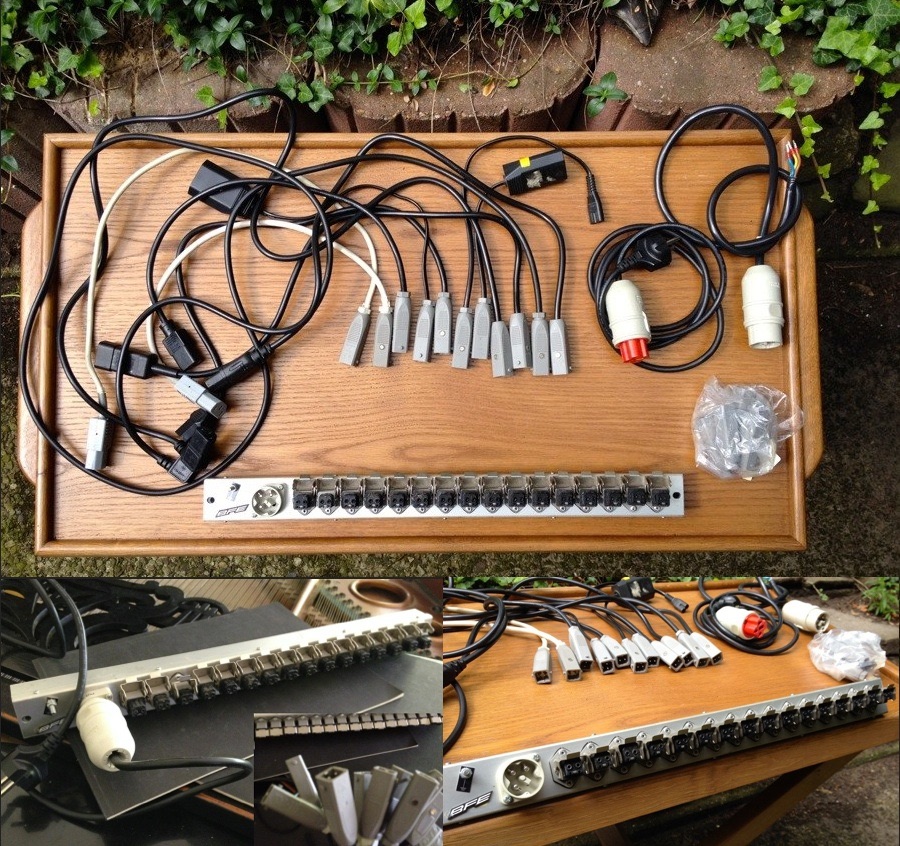 For the power supply inside the desk, I use a Hirschmann distribution strip that found its way to me. I much prefer it to a Schuko outlet because it offers 16 appliance outlets while being only 19 inches wide and 1U high. On the outside, it also offers a grounding screw in case circuit grounding is necessary. There I also connect the grounding of the turntable.
The right photo shows the inside of the desk rack. Above the open cable channels, below the Hirschmann distributor and below that the Mamba Patchbay with the audio connectors for the audio interface (D-Sub 25).
Apart from the compact size, it is good that all power cables are secured. By rotary locking (main supply cable) or by metal brackets that lock the inserted device cable when folded down. Even if Hirschmann plug systems are somewhat more expensive than sockets - it is worth it and can be integrated much better (size!) than clunky Schuko plugs.
The required tools
Jigsaw, grinder, drill
By buying pre-sawn birch multiplex rectangles (DIY store or Internet), the biggest obstacles have already been overcome: long accurate cuts! This can be done with small tools only with considerable effort and great skill. I find the wood thickness of 21mm perfect and it can be processed with simple tools. The price difference to 30mm was tremendous! The first thing to do is to use a jigsaw to saw off lots of triangles from the squares, since neither the top nor the sides of my table consist of a square. Of the 19 rectangles, 7 are made into polygons and 12 remain rectangular. For sawing I have a simple workbench in the basement - I think that is very helpful - for clean and accurate cuts the workpieces need to be well constrained.
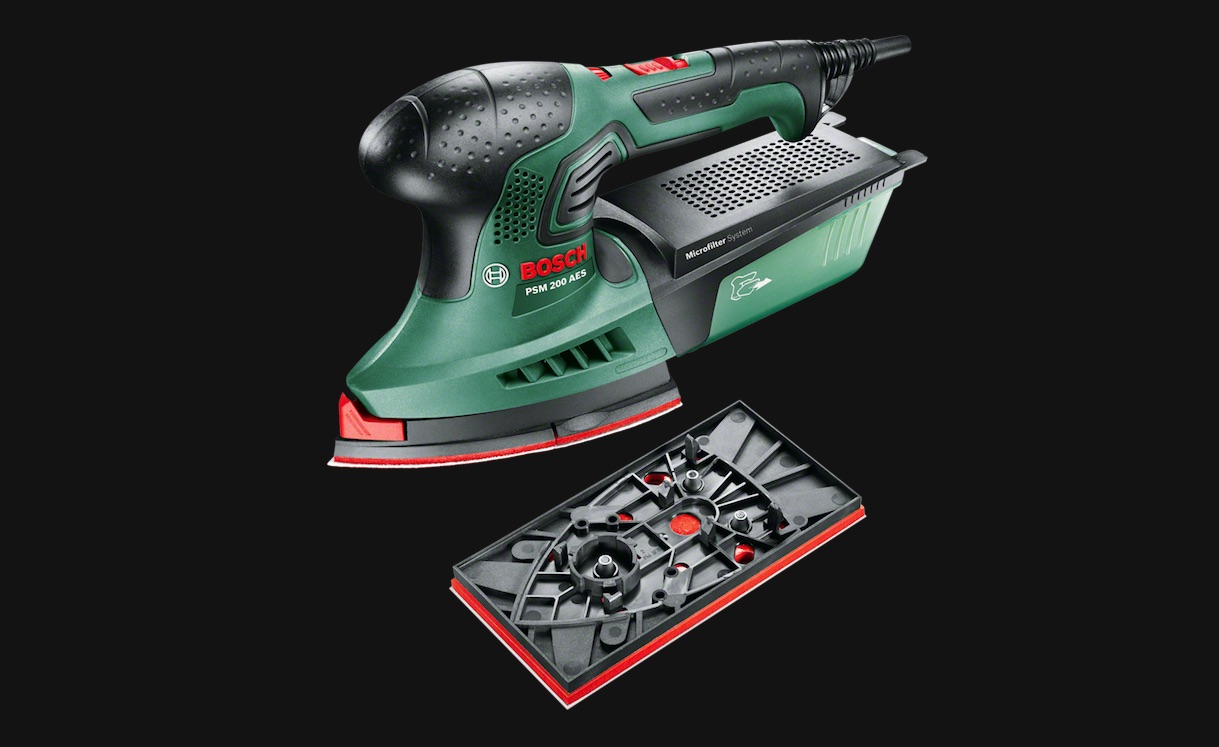 After sawing the first sanding operation follows (cleaning up the cut edges). I did this with a Bosch Multi grinder PSM 200 AES - not great, but surprisingly good and low-priced. It's called a multi-sander because it comes with an interchangeable rectangular face in addition to the delta tip. Both shapes are useful for bench work. Sanding is the most crucial operation. You will feel it, even in the future, with every touch, thus whenever you will sit at the desk.
Sponges and Cloths - no Brushes.
 For staining I cut household sponges into three parts. Better and cheaper is impossible. On YouTube there are also countless instructions - as well as for the final greasing. For this I tied a discarded tea towel into a mushroom and soaked it with oil. Just to be on the safe side, the cloths need to be spread out flat after work, otherwise there's a risk of self-ignition. I was a little grouchy about oiling, but it turned out to be the easiest job and acted like a release from the week-long DIY fit. Final oiling.
Conclusion
The whole project was superb! It took almost a month and was very exhausting in parts - but that's what makes it special. The quality is excellent - far better than I could have ever dreamed of!
I gained more than 2.5 square meters in the room and I am no longer built up to head height. As a result, I was able to lower the speakers more than 30cm. For critical work (mastering), I can then place my acoustic elements and tuned absorbers at a slight angle in the room and optimize the acoustics a bit more. The table feels like an expensive piece of furniture and everything is accessible at the right distance. There are no problems with reflections. Full score.
I have learned that the high price of studio furniture is not due to the material, but to the amount of work. I am all the more glad to have done it myself. There are many things that are different from purchased tables: Multiplex wood instead of MDF, absolute customization / adaptation to the existing equipment (that would be considerable surcharges) and better stability: with all the commercial tables and sideracks I have seen, I did not like the fact that they only got really stable when equipment was screwed in. The Argosy Siderack (which I used to have) is an extreme example of this - but looks very nice. Last, oiled wood also feels better or warmer and reflects less sound than foiled MDF.
The biggest obstacle for me were the doubts whether I could perform this work satisfactorily. Some good tools and sufficient patience are very beneficial to a good success here.
Studio
 Recording "properly" is a complete job - and one that also requires a hefty financial commitment and some technical knowledge beforehand. Making music at the same time is not really considered. But if you want to do it anyway, it quickly becomes a balancing act.
 Even if a recording is well mixed, the decisive difference comes with the "master" (actually one speaks of the "pre-master"). This requires volume and dynamic adjustment and equalizing - and the highest quality is required. The big question is "ITB" or "OTB"? (software or hardware)
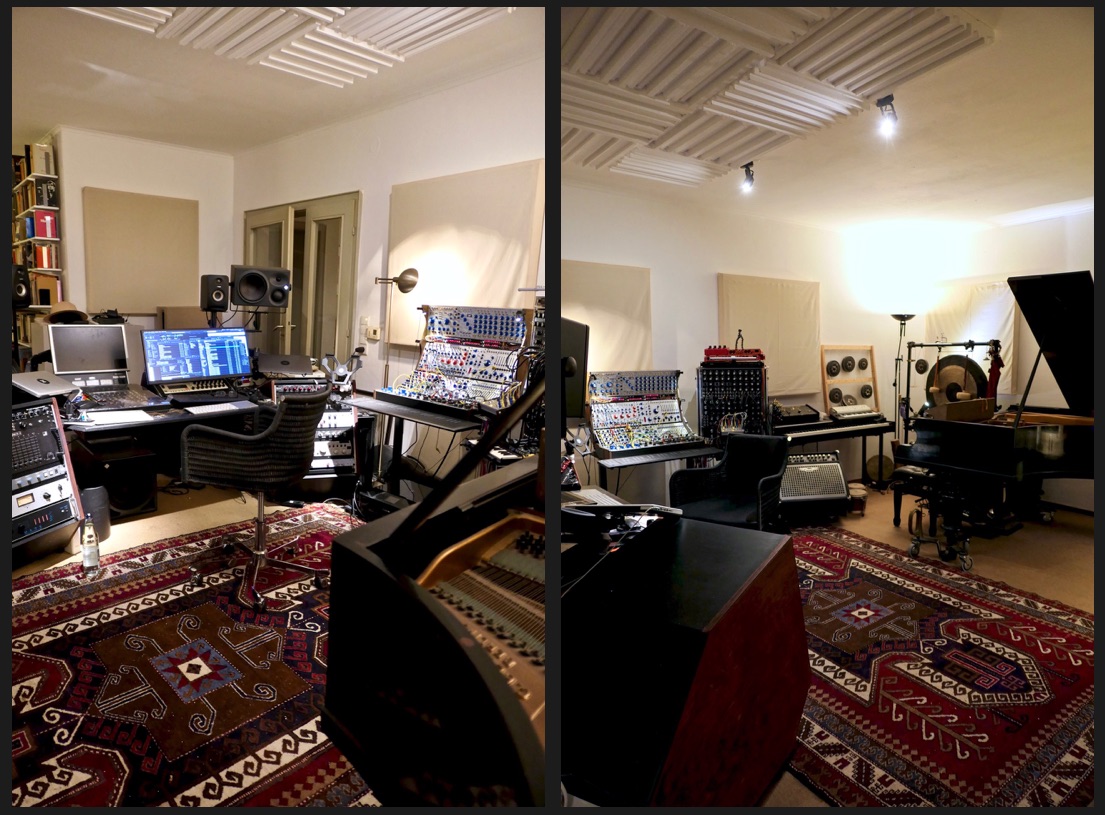
 After 10 years, a new overview of the significantly reduced and more structured setup, which offers me everything I need and gives me great pleasure. Technical advances and the completion of my “comparative research” have resulted in improved handling and speed. Less is more.
 Besides MAX, I use very little software, but for audio editing and mastering I have a few programs, of course, and that includes a "repair kit" to remove humming, noise, etc.
 The biggest obstacle for me were the doubts whether I could perform this work satisfactorily. Some good tools and sufficient patience are very conducive to good success here.
 Every room has its individual "room modes" due to its shape, length, width and height. The calculation of these modes is the first step in any acoustic improvement process.
