Acoustic room improvement (DIY)
A well-known problem for anyone dealing with sound: the acoustics of the room are insufficient or even beyond the pain threshold. This is due to so-called "standing waves", echoes and resonances. Every room produces individual "room eigenmodes" due to its shape, length, width and height, and their calculation for attenuation or complete elimination, is the beginning of any acoustic optimization.
After ending my period of life with regular presence in great studios, it became necessary to significantly improve the music room in my house. Most people (like me) at the beginning of this project have more or less no idea how, where and what to start with. In addition, the willingness to spend a lot of money on acoustic optimization is probably relatively low.
However, it is not about building a sound studio, nor about achieving studio acoustics, which in its own way, due to the strong damping, is also tiring and not well suited for playing music. The goal is the acoustic taming of a music room - acoustically pleasant, balanced and, if possible, also well and decent in appearance.
For this purpose, absorbers (to swallow the sound) and diffusers (to distribute the sound more evenly in the room) are needed. However, the first thing that is necessary is to examine the acoustics of the room. This should always precede any insulation measures in order to achieve the best possible effect with the minimum possible means.
Calculate Room Eigenmodes
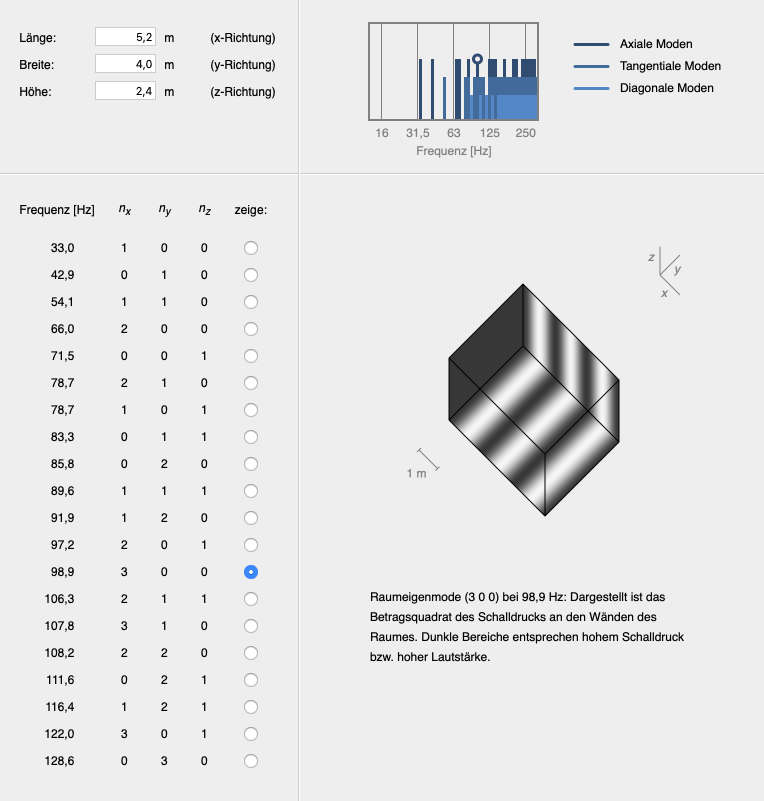 First there is some theory, but it can be mastered. The internet has a number of room mode calculators - I used the Hunecke room eigenmode calculator, which can be seen in the picture. It is only suitable for rectangular rooms, but therefore also very easy to understand.
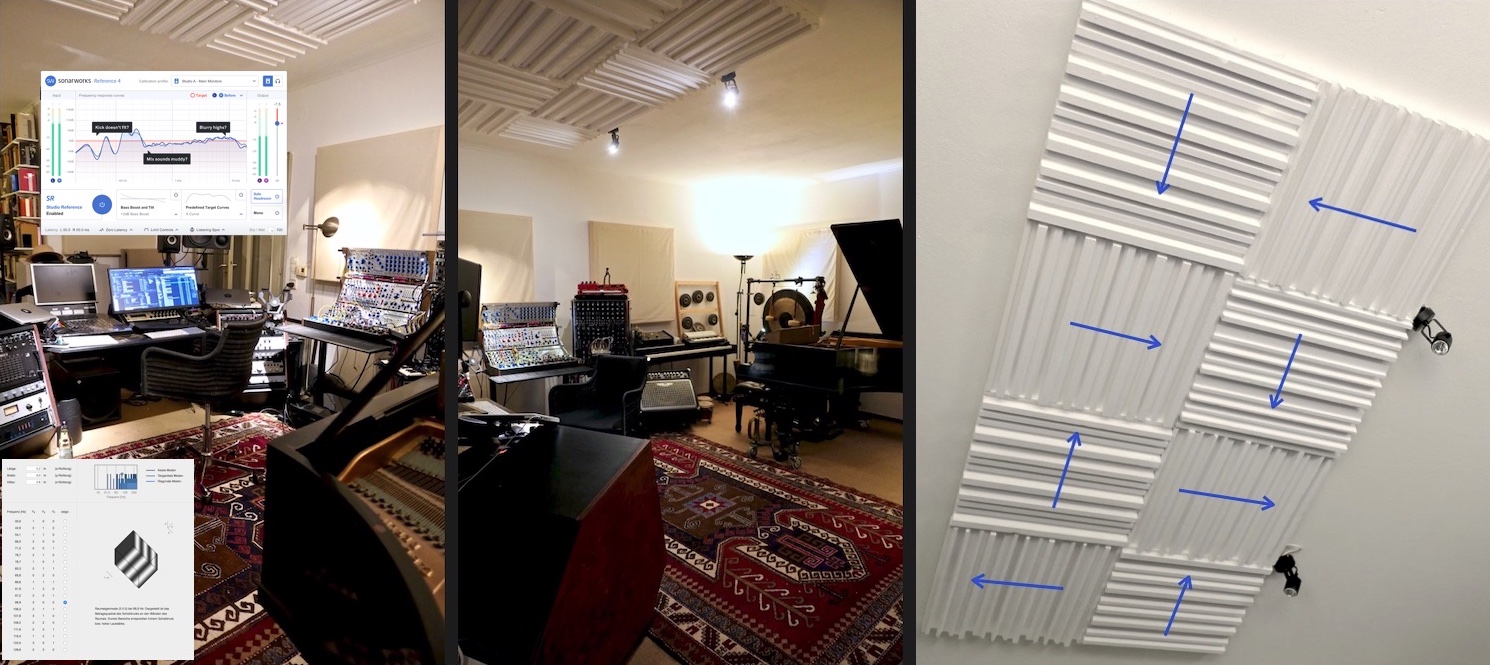
After specifying the length, width and height of the room, the lowest 20 room frequencies are calculated and - that's why I had chosen it - visualized in a graphic according to the frequencies. After that, I reproduced the frequencies with a sine generator from my loudspeakers (in the already set up room), walked along the walls and was surprised how exactly the graphic shows where which frequencies accumulate.
I can't recommend it enough to put this procedure at the beginning, because a kind of basic awareness immediately arises, how, and especially where the disturbing sound reflections have to be curbed. Starting with the lowest frequencies will be the most useful, because they cause the most devastation and create the basis for further problems in higher ranges (frequency multiplication).
Absorbers are needed to absorb or capture low frequencies. In order not to put the room climate or the quality of the air in the room at risk, I deliberately refrain from using mineral wool of any kind.
Helmholtz Resonators (Resonating Absorbers)
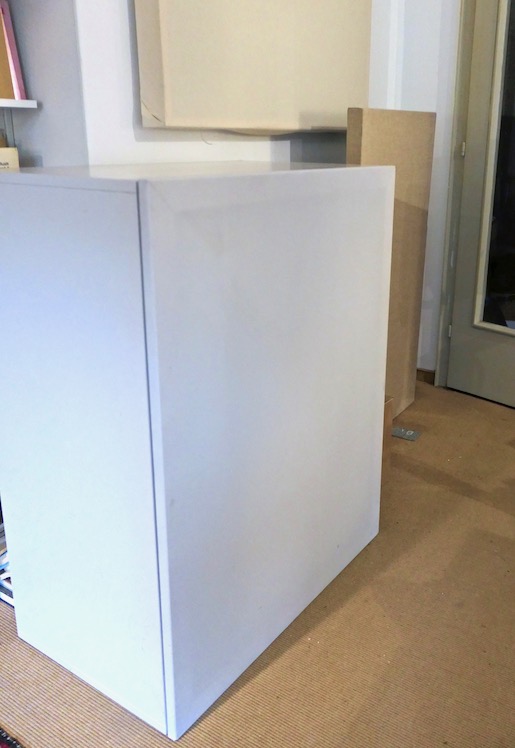
The lowest frequencies require the greatest effort, also spatially. I use two so-called "Helmholtz resonators" for this purpose. They are two 100x80x60cm boxes, as big as chests of drawers. Some years ago I got the used pair of these resonators and they amazingly solved the worst problem, some deep standing waves. This problem (deep standing waves) becomes much more pronounced as soon as a subwoofer is used in the room. Subwoofers require special treatment in the room because they emit frequencies with very long wavelengths. Bass absorbers also require a lot of space (quasi the double basses among absorbers).
 My Helmholtz resonators are from mb-akustik and have a broadband design. Today they are built somewhat smaller and belong to the "type B". They are effective from about 30 Hz! The actual corner frequencies are of course higher and fall off up and down in a certain slope (just like an EQ). Even though they seem clunky and large, these boxes are an effective solution for "room droning" because, in my perception, they do more throughout the room due to their "counter-vibration" than thick foam/mineral wool absorbers where the low frequencies are simply "swallowed" at the walls. Nevertheless, some additional "porous absorbers" will be helpful and necessary.
Another advantage of the Helmholtz resonators is the much longer durability due to the MDF construction. Foam at some point (after about 5-10 years) has largely emitted its plasticizers and then begins to trickle, or, even worse, sets mold due to moisture intrusion inside. Since even with foam absorbers, the lowest frequencies require the most money to be spent, durability is therefore a factor that is doubly important here! (Cost control).
The Helmholtz resonators are by far the most expensive part of the acoustic room optimization and I was somewhat hesitant to buy such expensive "boxes" (new about € 850.- each) - the used pair I had obtained for only €350.-. However, these hesitations, or rather the doubts on which they were based, were blown away when having (positioned) the resonators in the room!
These are big boxes with a powerful impact.
Some Helmholtz resonators are tuned to selected frequencies and then very narrowband. At mb-akustik these narrowband resonators belong to "Type A". Therefore, when buying used resonators, it is essential to pay attention to this peculiarity! Narrowband "Type A" resonators are in most cases only useful in the room for which they were built.
Porous Absorbers
As the most appealing solution between appearance, effect and price, I chose Basotect pyramid foam. My experiences with DIY mineral wool absorbers was that the indoor climate (the air in the room) suffers too much from it and therefore I strictly want to avoid mineral wool in the room! The Basotect pyramids are made of 7cm thick melamine foam. On a 5cm base sitting 2cm high pyramids.
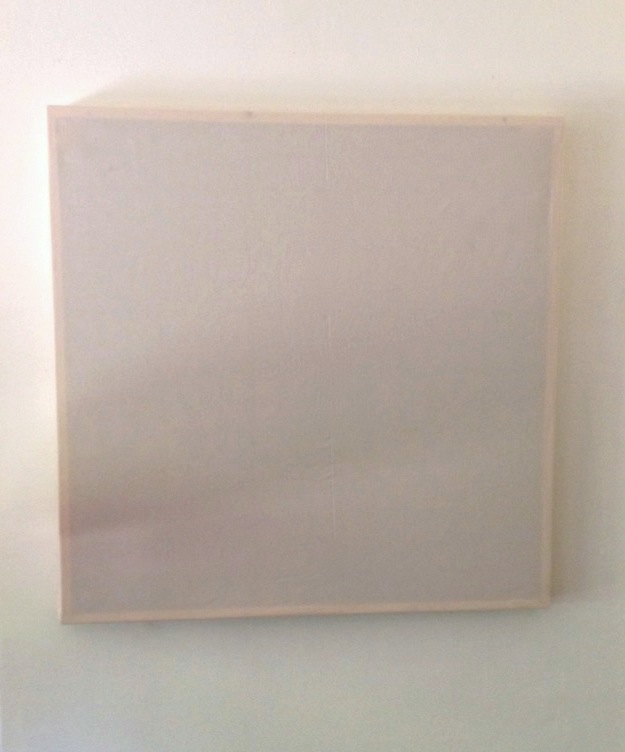 I therefore built wooden frames for the 100x100cm absorbers and chose a thin fabric (the cheapest at IKEA) for covering, stretched around the outside and pulled together on the back and fixed with a loop to be able to replace it for washing or for changing colors. Of course, it could also be tacked, but this would make it much more difficult to refresh or maintain and would wear out the material (including the frame).
The sellers offer "acoustic glue" for these absorbers, which I consider to be sub-optimal. If the absorber is glued, it is unnecessarily stiffened and reduced in effect. I therefore have it " standing " in the front in the 12cm thick frame, so that between absorber and wall still 5cm air remains. The frame not only looks more discreet / better than glued pyramids on the wall - it also works acoustically much better! (Image right).
 The sound absorption coefficient of the pyramid foam is > 0.9 from about 600 Hz and 4 absorbers in the package was €160.-. The successor model is now available (somewhat more expensive) under the Thomann house brand "t.akustik".
I only use these "standard absorbers" on the walls - they could of course also be used on a ceiling, but the (delicate and fragile) material is too soft to hang straight and, if it is not to be glued, would have to be additionally stabilized from below (perhaps by a diagonal cross of nylon cord). For the ceiling, however, I have found - after some unsatisfactory attempts with various absorbers - another, much better solution::
Diffusers
Especially at my studio table I was not satisfied with the sound for a long time and had therefore experimented with different absorber suspensions above this place. However, the changes were rather negative, which took time to understand. In addition, mids and highs overlapped, which sounded like distortion and made the spatial localization of the sounds from the speakers virtually impossible. Especially in smaller rooms (with short reverberation times of less than a second), overattenuation quickly occurs when using absorbers, so there is no way around the Diffuser for a tidy sound. Due to the high prices and the sometimes considerable weight, which I do not want to have over my head, I had long refused diffusers.
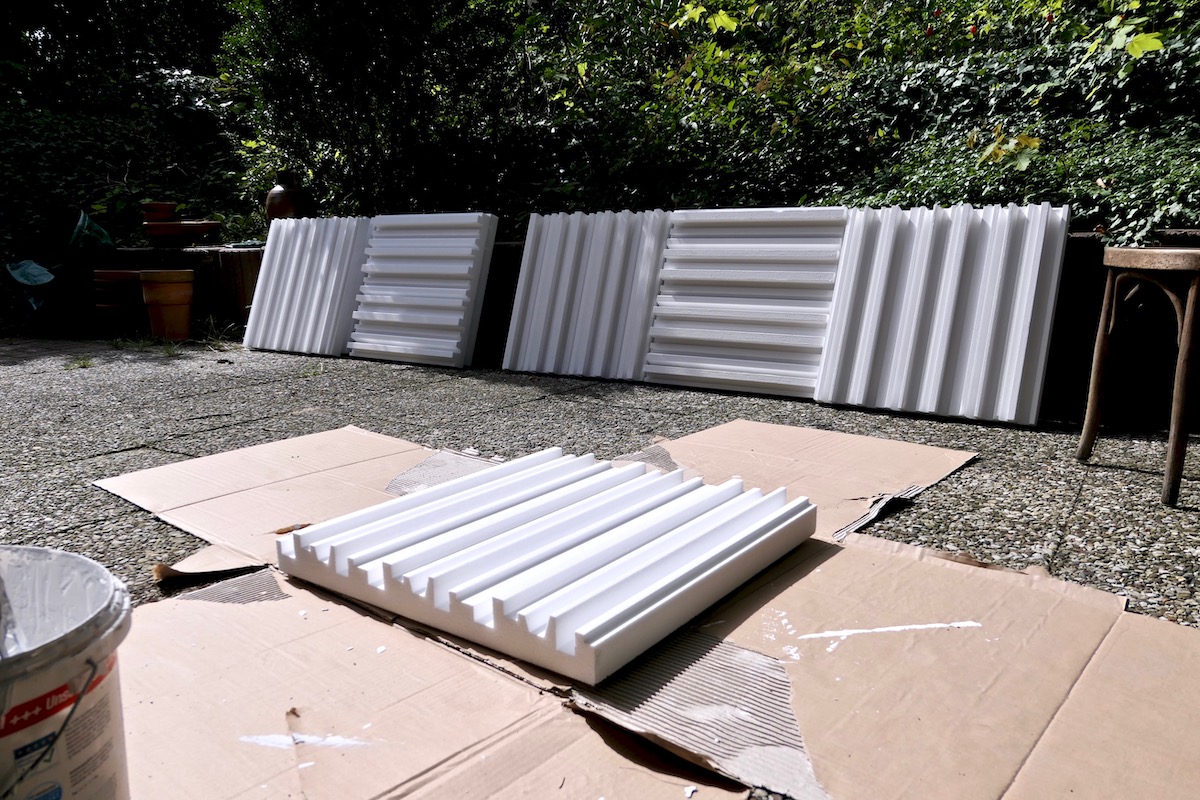
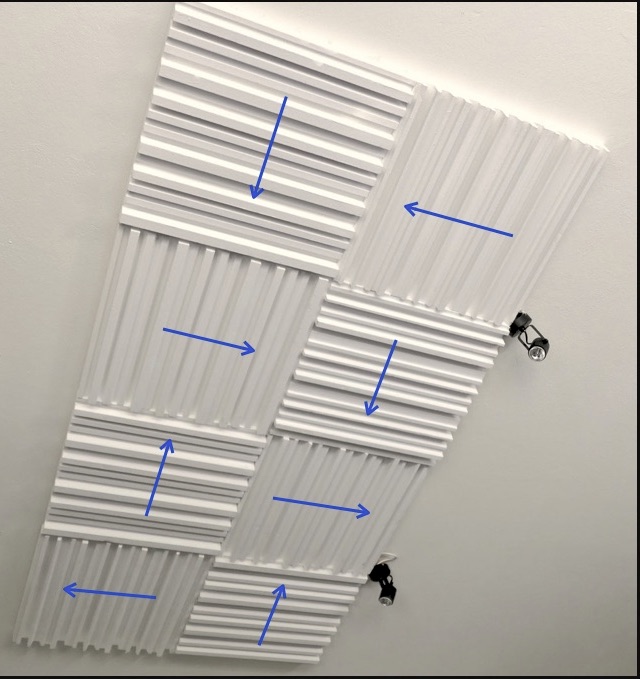 As a possible solution, which is lightweight and very inexpensive, came the 60x60cm WDS-7 diffusers, which come in a package of 8 pieces and are fabulously cheap at €89.- (complete!). I just had to first overcome my fundamental rejection of EPS foam (not Styrofoam, but foamed polystyrene), which took some time. The "look" also required some aesthetic concession. But the effect immediately convinced me.
Diffusers are categorized into 1D and 2D diffusers, where 1D radiates frequencies in the horizontal stereo base and 2D scatters in all directions of the room. Roughly speaking, 1D is more likely to be used on the side walls and 2D on ceiling, front and rear walls. However, the smaller the room, the more often 2D diffusers may be more suitable on the sides as well. The important thing with diffusers is that they are not too close to the ear, so that the diffusion gets the space it needs. The shallow depth (7cm with max 5cm recess) of the WDS-7 also suited me, as I am 2m high and the ceiling is 2.5m. Most "better" (more expensive) diffusers have a depth of 12-18cm. The still slight absorbtion of the diffusers (even after being painted), also does not show anay negative effect!
The WDS-7 diffusers belong to the 1D category, but by arranging them in opposite directions they can definitely achieve a kind of 2D effect. Again: these diffusers are extremely cheap! More expensive EPS diffusers already cost over €85 per panel! How much better they are, I can not say - in any case, I am very satisfied and will probably order another package of these diffusers for experiments on the walls.
However, with such EPS diffusers more details have to be taken into account during processing:
 Due to the softness of EPS foam, I think gluing makes sense. Do not glue at specific points, but over the entire surface to reduce natural vibrations. EPS foam should not be "pushed" - pressure points are caused immediately, which then remain permanently! When gluing, the panels also do not need to be pressured because of their low self-weight. When using e.g. Thomann acoustic glue, it is sufficient to "hold" them for a few seconds on the wall or ceiling with very soft pressure. For 2-3 minutes, a subsequent position correction is also still possible. The glue seems to me very gentle to the plaster and easy to remove again - no comparison with Montage adhesives!
Untreated, these diffusers absorb quite (too) strong. In order to reduce this, I painted the panels with dispersion (except for the back) before applying them. The hardening of the paint noticeably improves the effect and also reduces the styrofoam look. It takes a relatively large amount of paint: the area to be painted is almost 2sqm for a 60x60cm panel (due to the grooved structure) and the porous foam also absorbs a lot of paint. This means that for 8 diffusers (one set), 5 liters might be too little yet. The paint also serves as a sealant for the EPS foam.
For gluing I used Thomann's acoustic glue. One cartridge was exactly enough for the 8 panels (with adhesive "garlands"). If the panels are to be glued flat according to instructions (spread the glue with a spatula), a second cartridge will be required. Thus, with glue and paint, I paid only about €110.- for the ceiling construction with 8 panels. The easy, but somewhat mindless work (painting the many mini-surfaces!), I have, with pauses for drying, easily managed within a day.
Gobos (go-betweens)
 Mobile acoustic separators are sometimes extremely helpful - especially when recording with microphones in the room. In the course of my absorber experiments, I had mounted two EQ Acoustics Spectrum 2 L5 Tiles (1150 x 575 x 50 mm) on the ceiling, but they had not satisfied me. I noticed that they were much more absorbent in close proximity than the pyramid foam - which I much prefer in its effect on the wall for the room. So without further ado I converted them and am now the proud owner of two Gobos.
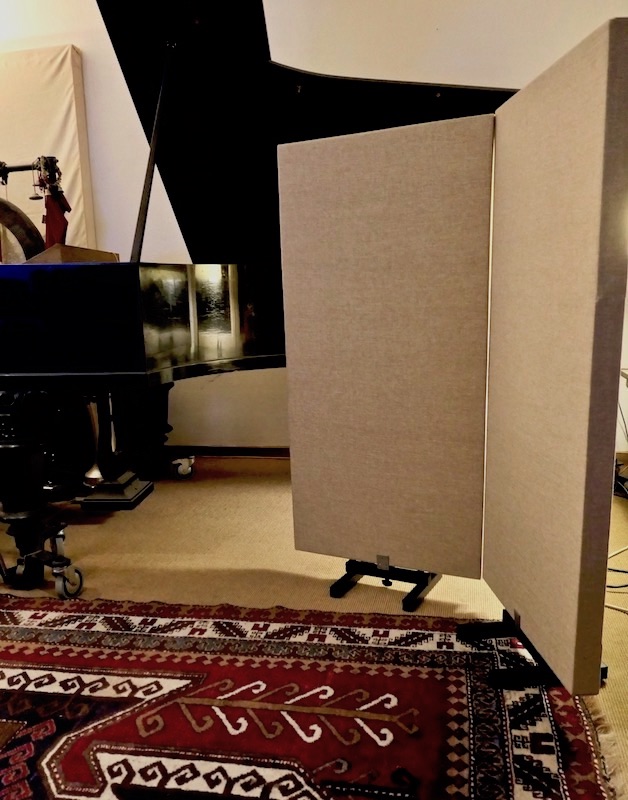
In order to let them stand freely in the room, I mounted them to floor stands (Showlite FLS-10 PAR light floor stands). For fixing the absorber I screwed two metal angles (as a "U") to the feet, so that the absorber can be easily inserted and also removed again. The front angle is only 6cm high (for aesthetic reasons), the back angle is 20cm high (so it's more like a "J"). Since the back of the absorbers can be used for Velcro, I put some Velcro on the inside of the long angle for additional fastening. When lifting the Gobo, the stand stays on the Gobo, of course. Very handy. Such a pair of Gobos are indeed a great deal and they make recordings in the room much easier!
When both Gobos are at an angle next to each other, they are very good for keeping the sound reflections of the room away from the mic. The low height of 1.25m also suits me very well, as they do not block eye contact even when sitting down.
Electronic Calibration of the Monitoring Location
Following the general room acoustics, the monitoring position (at the mixing console or at the DAW [computer]) is of course to be subjected to special treatment: here, the optimum should be approached as closely as possible. This may have already been evident from the positioning of the diffusers on the ceiling - they are exactly above that space. For a real "fine tuning" therefore an electronic calibration is suitable, because it also integrates the used loudspeakers in the process. This requires software and a measurement microphone. I use Sonarworks Reference, a very good "package", also for headphones, which can be purchased together with a measurement microphone, for relatively little money. Good measurement microphones are very expensive and I only need them to calibrate my room, so extremely rarely. The included measurement microphone is mediocre, but has its own serial number. Each of these microphones has been measured prior to sale, the individual deviations are documented. After entering the serial number on the website, you get the protocol, which is then used by the software to balance the values of the microphone. Great idea! Works..
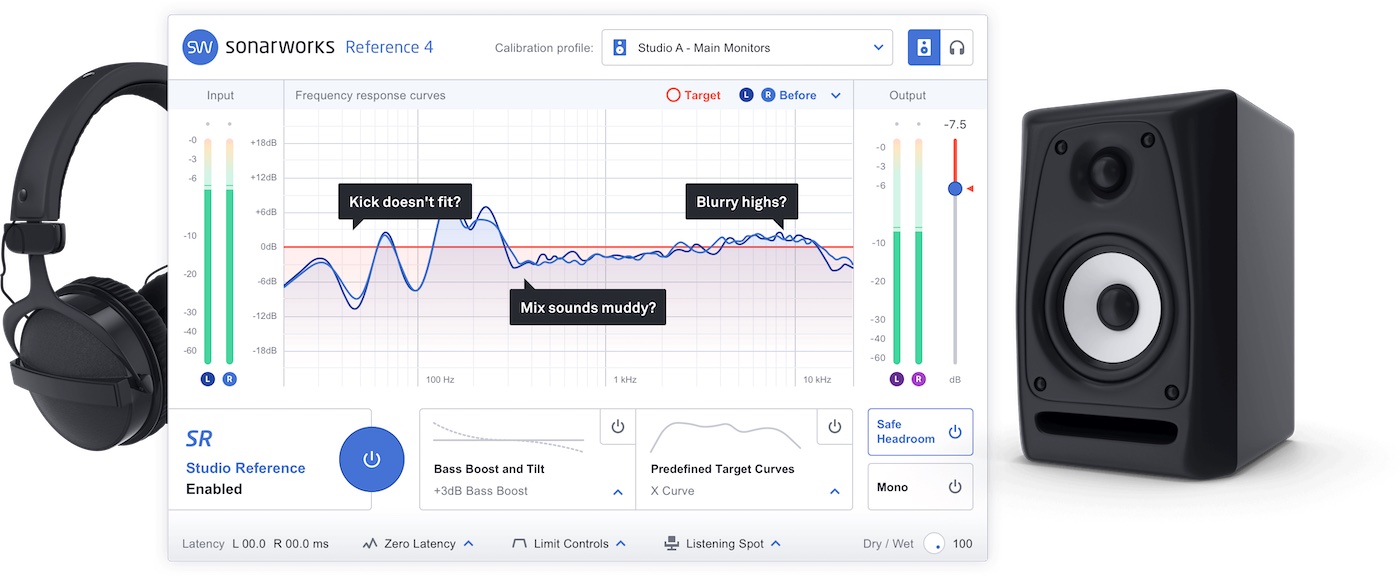 The calibration process is as follows: The software "Reference 4" gives different positions for the microphone, which are very easy to locate, being GUI-supported. The software reflects the position of the microphone by a dot and shows the position to be taken by a circle. Thus you can see if the microphone is in the right place (=in the circle). If the position is correct, a signal sequence is triggered via the loudspeakers. In a few steps the whole calibration process is finished and an EQ curve is created, which is inserted between DAW and amplifier. It corrects the acoustic imbalance at the listening position - also by means of channel volume adjustments.
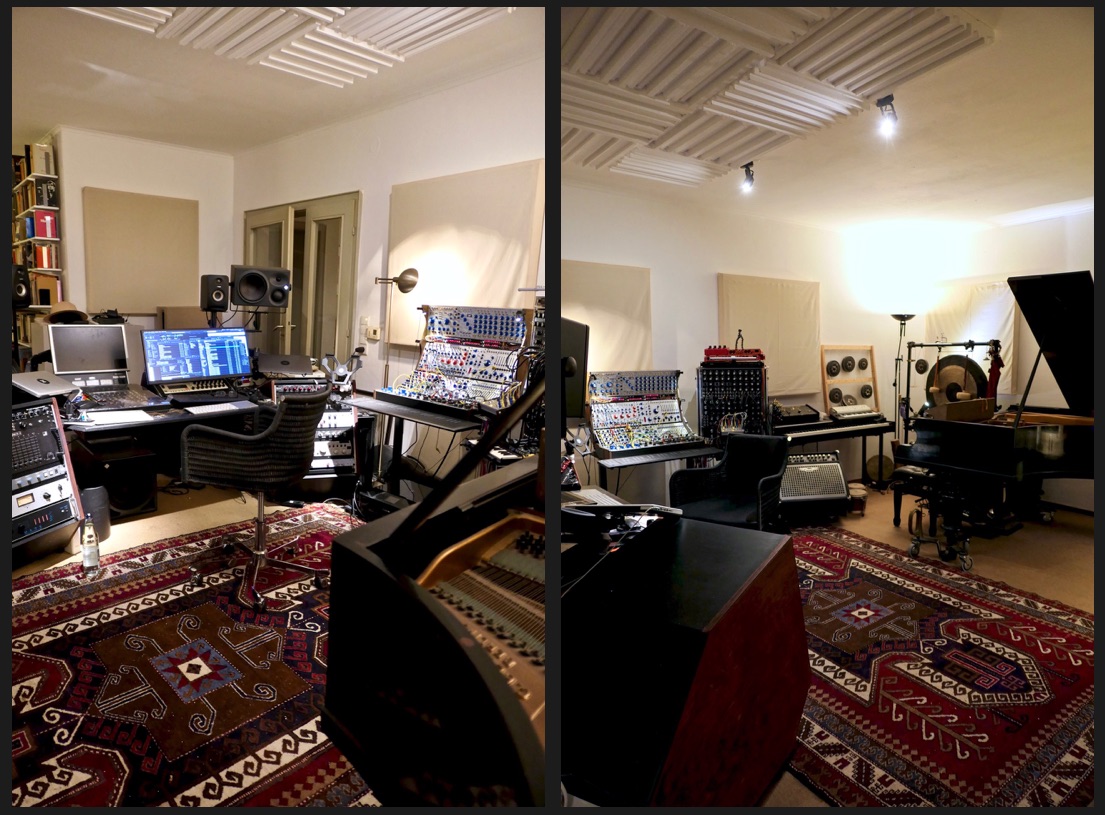
In my room, for example, I don't have the studio table in the symmetrical center of the room. As a result, one speaker is much closer to the wall than the other. Despite the acoustic optimization, there are still (of course) more reflections on the closer side to the wall and thus a slightly increased volume, which makes the stereo image somewhat "skewed". Exactly these kind of problems are excellently solved and compensated by Sonarworks Reference 4. This increases the chance that your own mixes will sound good on other systems! It is, I think, the most affordable solution for electronic calibration. Very helpful!
A Résumé and a Conjecture
There is no really inexpensive solution for the low frequencies. Bass is a serious matter - the foundation. Think big! The price of my two Resonators is, at the moment, half of the cost of all the acoustic elements I use. I haven't tried any bass traps or other porous absorbers yet to compare the low end - just by the amount needed (without resonators), I fear a price rather even higher than that of the Resonators - including extra work and greater visual impact/disruption. However, a few additional bass traps in support of the Resonators are well within the realm of imagination to me.
With the standard absorbers and the EPS diffusers, I have supplied myself from the lowest "price level with frequency specifications" and am both amazed and delighted at the good impact. However, this impact has been achieved only because the room has been analyzed beforehand (modes), and because the elements have been placed correctly and haven't been processed in the state in which they arrived (color, covered frames, arrangement). It is advisable to read a little about how diffusers work, as no instructions for use will be provided with them.
The acoustic improvements are significant and I am very happy about it! I will experiment further, especially with diffusers. There is no perceptible change in the air quality of the room due to the elements used. The altered acoustics noticeably improve the whole "room climate"! Good acoustics also creates well-being.
All supposedly much better alternatives to the absorbers and diffusers I chose mean at least an eight- to tenfold increase in cost. At this price, I would make the step to an expert beforehand and then have a tailored system, which would certainly be expandable in various stages (especially since the company would also later have all the data on the room).
As a solitary clueless customer in the vast market, you run the risk of making bad purchases. Loads of foams with too little effect - well recognizable by missing frequency specifications - I would therefore only consider products that are provided with technical (frequency) specifications. It is also difficult with diffusers. Many models offered - often from the EU foreign countries on eBay - are without protocols and quite a number of QRDs have such thin woods installed that I fear that they tend to build up their own resonances at loudness.
Therefore, I prefer to trust the "responsibility" of the larger music stores that offer such elements under their own brands. Compared to the more expensive products (also from other manufacturers) on the music store websites, I suspect that the surcharges are mainly paid for the more elaborate look and more expensive material (wood). Functionally, I suspect only minor differences. So if you are willing to do some DIY, the cheaper range is certainly suitable!
I rather dislike the "professional" look of the pimped foam corners anyway. I am and remain a self-confessed anti-professional.
Studio
 Recording "properly" is a complete job - and one that also requires a hefty financial commitment and some technical knowledge beforehand. Making music at the same time is not really considered. But if you want to do it anyway, it quickly becomes a balancing act.
 Even if a recording is well mixed, the decisive difference comes with the "master" (actually one speaks of the "pre-master"). This requires volume and dynamic adjustment and equalizing - and the highest quality is required. The big question is "ITB" or "OTB"? (software or hardware)
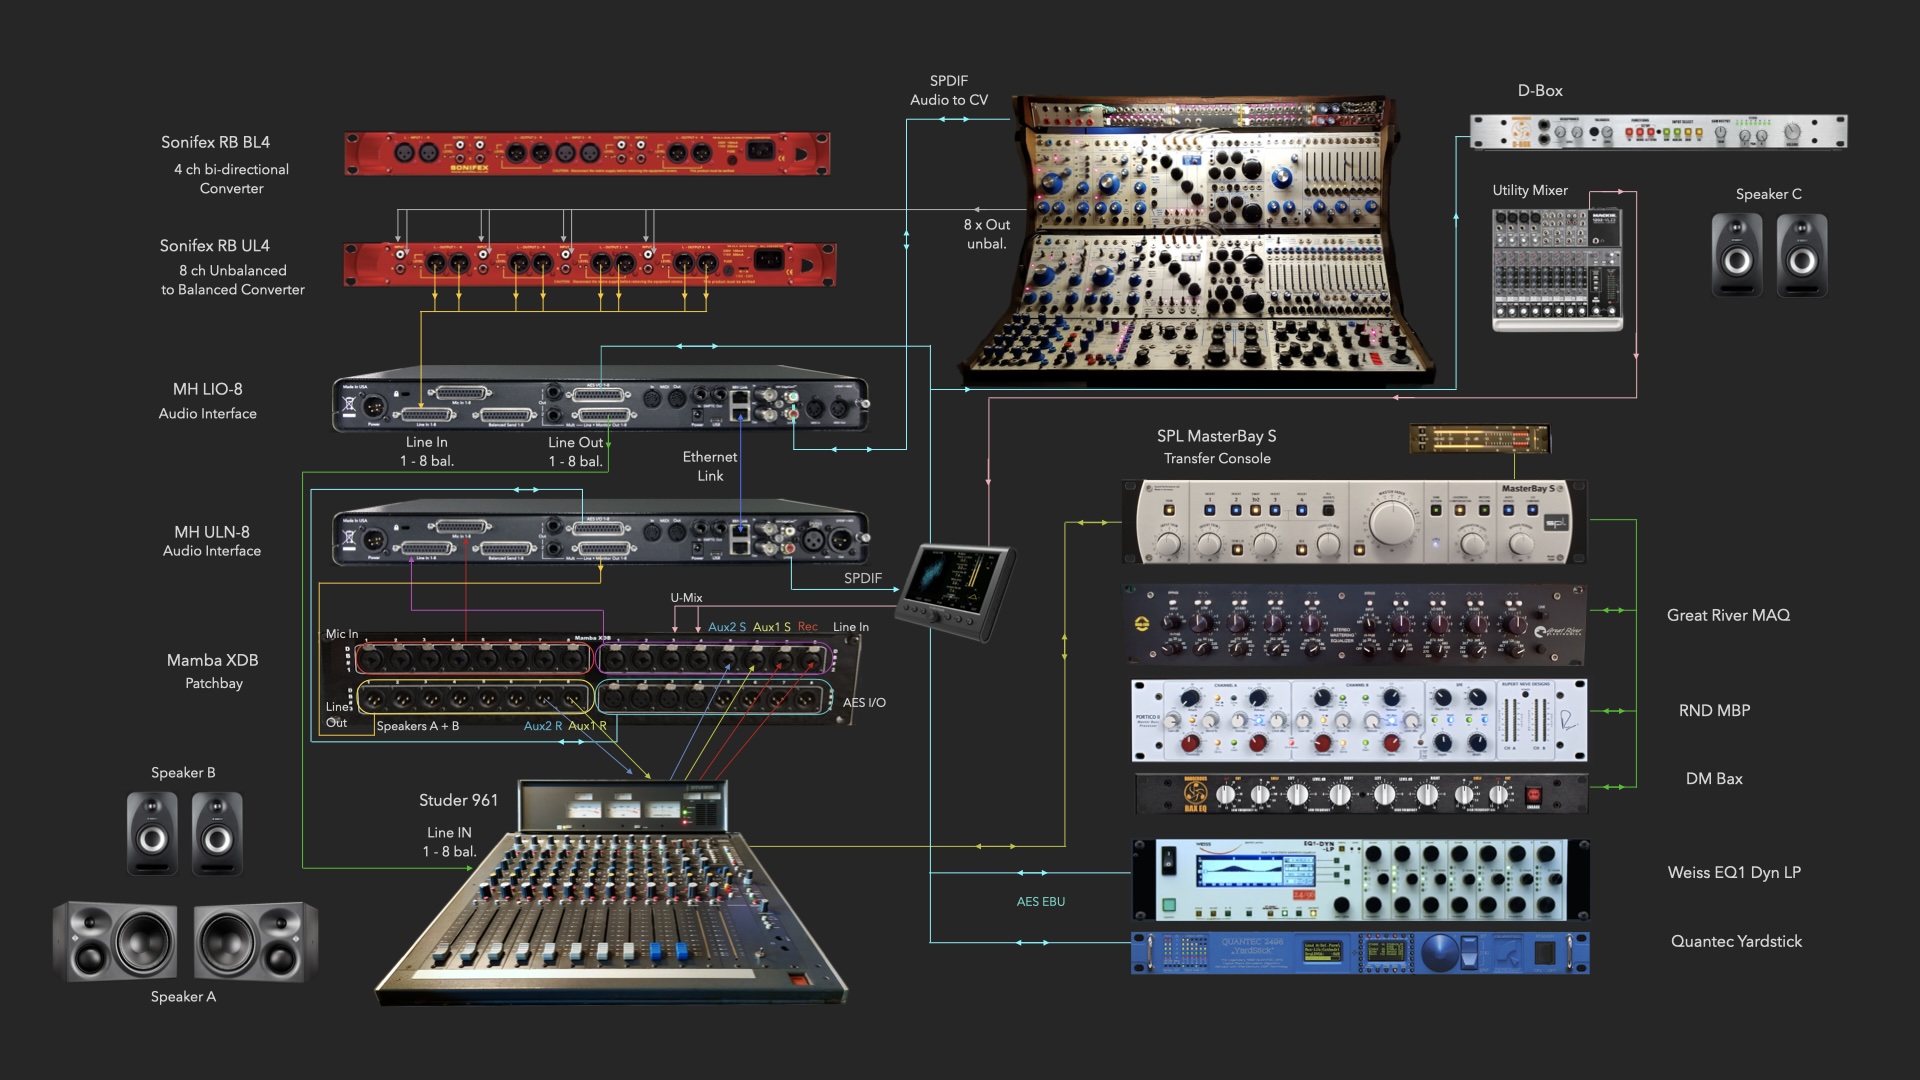 After 10 years, a new overview of the significantly reduced and more structured setup, which offers me everything I need and gives me great pleasure. Technical advances and the completion of my “comparative research” have resulted in improved handling and speed. Less is more.
 Besides MAX, I use very little software, but for audio editing and mastering I have a few programs, of course, and that includes a "repair kit" to remove humming, noise, etc.
 The biggest obstacle for me were the doubts whether I could perform this work satisfactorily. Some good tools and sufficient patience are very conducive to good success here.
 Every room has its individual "room modes" due to its shape, length, width and height. The calculation of these modes is the first step in any acoustic improvement process.
